Object selection in Sky Tycoon is not handled in the traditional Unity way using colliders and OnMouse or IPointer events.
Instead, to achieve pixel-perfect selection with minimal performance impact, the game uses a custom solution based on rendering selectable objects to a RenderTexture and getting selection info from it during each frame.
In theory
I first came across the idea of performing object selection via shader output when playing The Sims 4 recently.
Check out this clip of the game where the selection alternates between sink and counter. If there were colliders — even mesh colliders — involved, you’d expect selection to not work properly when moving into the inset area of the sink.

To perform pixel-perfect selection, Sky Tycoon assigns a unique id to each object placed in the scene. Converted to a color, this id is rendered each frame to a `RenderTexture` using Replaced Shaders (https://docs.unity3d.com/Manual/SL-ShaderReplacement.html). Using input coordinates like mouse position, the game can then decide which color (and in turn unique id) is currently hovered.
Converting id to color
In order to render the unique object ids, the game has to convert its internal id format from a uint to Color. Reading the selection id back from the RenderTexture, the same process has to be performed in reverse.
This could be done inside the replacement shader, but since the conversion from id to color only needs to happen once during object initialization, the game stores the converted color inside a MaterialPropertyBlock, which can be accessed from within shaders using
fixed4 c = UNITY_ACCESS_INSTANCED_PROP(_SelectionColor);Converting from uint to Color is an interesting subject. Unity’s Color allows for storage of four byte-sized components, namely RGB and A. Conveniently, the default uint type in C# stores it’s values in a 32-bit format, which in turn can be stored in exactly four bytes.
This method is akin to float packing (http://aras-p.info/blog/2009/07/30/encoding-floats-to-rgba-the-final/), but does not suffer from precision issues when rendered to an `ARGB32` target.
To convert a uint (or any 32-bit data structure for that matter) to a Color, you can get the four bytes it’s represented by and simply push them into Unity’s COlor32 struct, which already allows for assignment by byte values and is implicitly convertible to Color. Getting the separate bytes of a data type can be done using .NET’s System.BitConverter.
public static Color32 UIntToColor(uint number) {
  var intBytes = BitConverter.GetBytes(number);

  return new Color32(intBytes[0], intBytes[1], intBytes[2], intBytes[3]);
}
Similarly, converting from a Color value back to a uint again utilizes the BitConverter class:
public static uint ColorToUInt(Color32 color) {
  return BitConverter.ToUInt32(color.ToByteArray(), 0);
}
To get a color’s RGBA channels as a byte array, I wrote a simple extension method for the Color32 struct:
public static byte[] ToByteArray(this Color32 color) {
  return new[] {color.r, color.g, color.b, color.a};
}
Rendering to a texture
Each frame, the previously stored Color of each selectable object is rendered using Replaced shaders to a separate RenderTexture.
To adhere to the pixel-perfect requirement, the game sets some additional properties on the RenderTexture upon creation.
selectionTexture = new RenderTexture(Screen.width, Screen.height, 0) {
  antiAliasing = 1,
  filterMode = FilterMode.Point,
  autoGenerateMips = false,
  depth = 24
};
Since there should be no anti-aliasing or filtering performed on the texture, both properties are turned off (or set to point filtering respectively). There’s no need for MipMaps, since the game only uses the texture in it’s full resolution anyway.
It is important to declare a depth buffer (https://en.wikipedia.org/wiki/Z-buffering) for the texture, since selectables in front of other selectables should be preferred when hovering over them.
Not writing any depth information can result in the following unwanted behaviour, where objects behind the foremost object are mistaken for the currently selected object when in reality the foremost object should be focused.

Additionally, the camera that renders to this texture should have it’s clear color set to RGBA(0, 0, 0, 0) since that equals no selection. The clear mode itself is set to Solid Color.
Here’s a comparison of what the game’s main camera sees and what’s rendered to the selection texture:
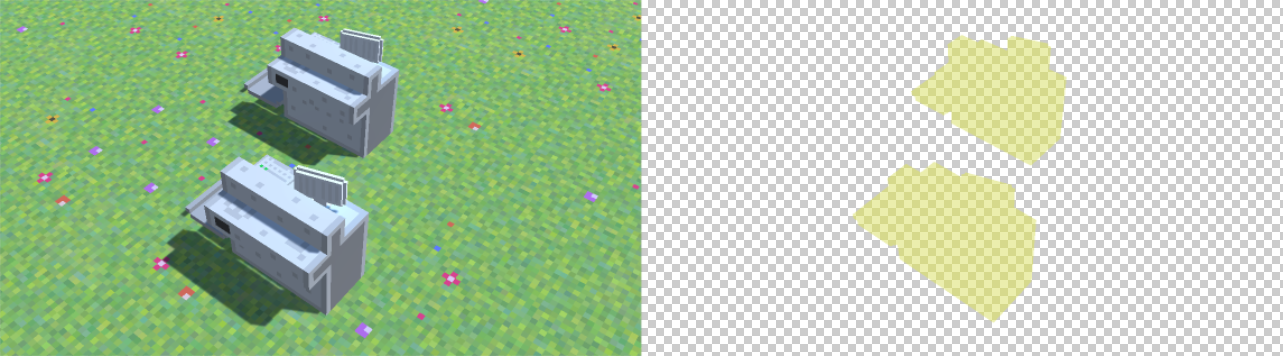
Note that I’ve increased the contrast of the selection texture, since it would otherwise be barely visible due to the alpha channel being used to encode values as well (very low ones in this case).
The shader that renders the selection colors themselves is very simple. As mentioned before, since Sky Tycoon uses Instancing for selectables like objects, actors, etc., the shader can access the selection color via a MaterialPropertyBlock. All the shader does then is render that color to the screen, overriding any previously rendered fragment. The shader has Z-Writing enabled by default, so it always renders the foremost object’s selection id.
Shader “Custom/Selection Id” {
  SubShader {
    Tags { “RenderType”=”Transparent” }
    Pass {
      CGPROGRAM
      #pragma vertex vert
      #pragma fragment frag

      #include “UnityCG.cginc”
      UNITY_INSTANCING_CBUFFER_START(Props)
        UNITY_DEFINE_INSTANCED_PROP(fixed4, _SelectionColor)
      UNITY_INSTANCING_CBUFFER_END

      float4 vert (float4 vertex : POSITION) : SV_POSITION {
        return UnityObjectToClipPos(vertex);
      }

      fixed4 frag () : SV_Target {
        return UNITY_ACCESS_INSTANCED_PROP(_SelectionColor);
      }
      ENDCG
    }
  }
}
Determining selection
The resulting RenderTexture is checked every frame for the color under the current mouse cursor position. If it results in something other than ‘no selection’ (RGBA(0, 0, 0, 0)), the game can then convert the color back to an id and look it up. If it is valid (e.g. exists in the game world), we then decide what to do with that information.
Usually, we display some sort of indicator to tell the user there’s an action to perform on this object. When left-clicking, we change the currently selected object to the one under the mouse cursor and tell the object about it. It is then individually able to decide which actions to take (open a dialog, etc.)
This is what the final selection behaviour looks like:

Conclusion
As you saw in this article, shaders are not only useful for end-user graphics computations, but can also be used to provide more complex game logic. Using shaders to perform pixel-perfect object selection is an interesting approach to a problem that would normally result in performance loss when too many objects are placed in your scenes.
I hope that this article shed some light into some of the finer inner workings of Sky Tycoon. If you have any questions regarding the article or Sky Tycoon in general, feel free to leave a comment or reach out to me on Twitter @CelestialStatic.
